Menu toggle

Annoying intermittent noise/rattle from nearside sill area of 987

ianthow

PCGB Member
Member
This relates to an issue I had about three years ago. Driving along on a slightly bumpy bit of road, I suddenly had a banging/rattling noise from the nearside of the car. It sounded like there might be something caught under the car so I stopped to check, nothing. Once home, I checked all the undertrays for anything trapped above them, still nothing. Noise would go, some times for days, but it did become more persistent so something had to be done.
Thinking the air intake might have ingested something, I checked inside the filter box, nothing.
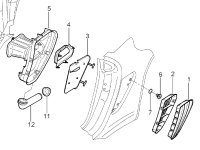
Next, I removed the intake trim, grille and baffles (1, 2 and 3 below) to check inside the intake duct (5), nothing.
The duct is a soft rubber and is easy to remove so I decided to pull that out for a look inside the body panel. The rubber duct has a drain hole in the bottom that fits into the tube (12) which drains any water into the rear wheel arch. This tube is supported by a horizontal plastic bracket attached to the inner wall of this body cavity. The bracket was rattling loose... Not easy access, tried twisting pulling etc, no luck. Checked if the other side of the panel was accessible to see how it was held. No luck, I believe there may another body skin behind it. You will note this support is not shown in the parts list, so no clues there. In desperation, I used some "Grabs Like Nails" adhesive that was to hand. Forced this in and around where the bracket fixes. With the tube in position and supported by a bar pushed into the tube from under the wheel arch, I refitted the rubber housing etc and left the adhesive to cure overnight.
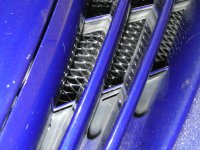
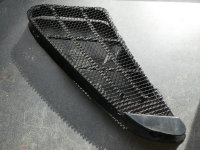
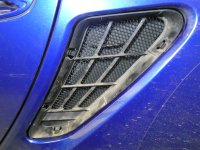
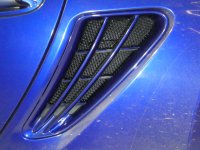
Success, and it it has stayed fixed! Knowing my luck, it may return to bite me, but at least I know where to look now. I also now know the correct way to remove the outer intake trim, NOT the way that umpteen YouTubers show. I may post that later, I also fitted a mesh behind the trim support (see photo below). Apologies for the grime in the photo, I am known for having a dirty car.
1718102077696.jpeg 1718104652045.jpeg
 
Last edited:
A good call Ian … thanks for the tip.👍

A reliable outer intake trim removal guide would be useful too, together with some guidance on fitting the mesh.

Jeff
 
A good call Ian … thanks for the tip.👍

A reliable outer intake trim removal guide would be useful too, together with some guidance on fitting the mesh.

Jeff
Hi Jeff,
I have done the trim removal guide but erroneously posted it on my region page. You can find it here:
 
Thanks Ian … I’d already picked it up.👍

I take it that it applies to the 987.2, but for anyone reading it I’m uncertain whether or not it also applies to the 987.1. Best to check the part numbers for clarification.

Well done for posting.

Jeff
 
I chose to fit mesh to the engine air intake to prevent stones or debris being sucked into this area. The other (right side) air intake is for engine cooling and anything getting in there will fall into the under tray or through onto the road, so I did not see a need there.

To fit the mesh, you have to remove the outer trim piece and an inner support bracket.
YouTube has many video clips showing people using brute force to pull the outer trim off. Not necessary or advisable.

The correct way to remove the outer trim

The trim has two tabs at the top which engage behind tabs on the inner support:
Top tabs.jpg

1718354377291.jpeg

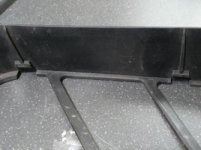
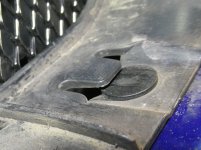
The upper and lower horizontal bars on the trim and support have a central tab and matching recess that interlock when pushed together.
1718354436255.jpeg

1718354504464.jpeg

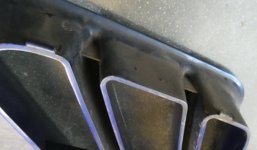
Looking from below, the slot in the lower bar of the support is visible, with the trim bar above it.
1718354552790.jpeg

To release the trim, start with the LOWER bar.
While pulling gently on the bottom of the trim, use a flat blade between the trim and support to prise them apart.
Maintain a light pull at the bottom and use the blade to release the tab on the upper bar.
The trim will now pull away cleanly at the bottom, releasing the two top trim tabs from behind the tabs on the support.

Remove the inner support.
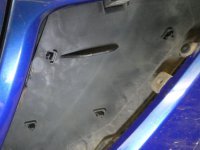
This is fitted onto four grooved plastic buttons and retained by tabs that lock behind the heads of the buttons.
1718354796047.jpeg
Carefully prise each one up and slide the support out off the buttons.

Behind the support is a baffle plate which some people suggest removing, allegedly to improve airflow. I suspect that this plate is there to prevent water being sucked into the intake, when passing heavy vehicles in very wet conditions. It will certainly stop any large pieces of grit from being ingested. Water and grit drain out of this area via a large drain tube that exits into the rear wheel arch.
7 - P1000350.JPG
I retained the baffle, it is tricky to release and remove. Removal is not necessary to fit the mesh.
Removal will expose the open end of the engine air intake tube.

I used is an extruded aluminium mesh, other products are available!.
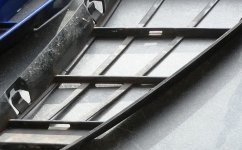
Cut the mesh to shape, leaving it slightly oversize. Use cable ties to secure the mesh to to the top and bottom ends of the 'upright' strips and fold the excess mesh over the edge of the support frame This adds some rigidity to the mesh. Soft plastic mesh could be superglued to the back of the support.

12 - P1000351.JPG

Assembly is simply a case refitting the support piece onto the slotted buttons, ensuring the tabs lock behind the buttons.
1718354979177.jpeg

Finally, engage the top of the outer trim behind the top tabs in the support and press the trim firmly into place to lock the bars on to the support.
1718355186019.jpeg
 

Posts made and opinions expressed are those of the individual forum members

Use of the Forum is subject to the Terms and Conditions

Disclaimer

The opinions expressed on this site are not necessarily those of the Club, who shall have no liability in respect of them or the accuracy of the content. The Club assumes no responsibility for any effects arising from errors or omissions.

Porsche Club Great Britain gives no warranties, guarantees or assurances and makes no representations or recommendations regarding any goods or services advertised on this site. It is the responsibility of visitors to satisfy themselves that goods and/or services supplied by any advertiser are bona fide and in no instance can the Porsche Club Great Britain be held responsible.

When responding to advertisements please ensure that you satisfy yourself of any applicable call charges on numbers not prefixed by usual "landline" STD Codes. Information can be obtained from the operator or the white pages. Before giving out ANY information regarding cars, or any other items for sale, please satisfy yourself that any potential purchaser is bona fide.

Directors of the Board of Porsche Club GB, Club Office Staff, Register Secretaries and Regional Organisers are often requested by Club members to provide information on matters connected with their cars and other matters referred to in the Club Rules. Such information, advice and assistance provided by such persons is given in good faith and is based on the personal experience and knowledge of the individual concerned.

Neither Porsche Club GB, nor any of the aforementioned, shall be under any liability in respect of any such information, advice or assistance given to members. Members are advised to consult qualified specialists for information, advice and assistance on matters connected with their cars at all times.

Back
Top