Menu toggle

Front strut installation advice

James_G

New member
Chaps

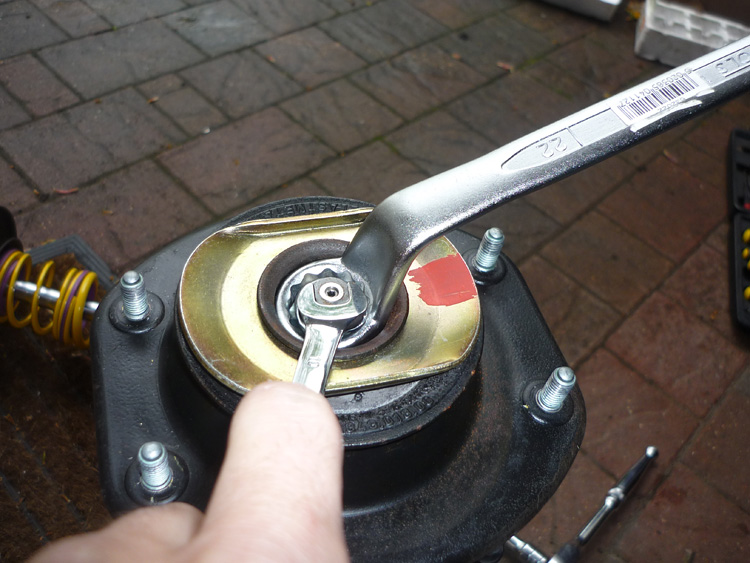
All the parts for the suspension refresh on my S2 have arrived and I've put aside the next day or so to do the work. I've done struts before and it all looks very similar but for the exception of the strut top retaining nut. Clark's guide explains that an air wrench is ideal for removing this 22mm nut, as that way the damper shaft won't spin. I don't have access to one, but I will improvise.

Installing the new strut means torquing up a new nut - so my question is how do I hold the damper shaft of the new strut adequately to apply the necessary torque (57 ft lbs apparently)? On previous cars the shaft has a hex slot in the top where you can use an allen key to hold the shaft, but I seem to remember this failing on me when I did it years ago on a Fiat. Are there some flats on the top of the shaft so that it can be suitably gripped?

Finally, any other tips and tricks for making things easier? I've already soaked everything in PlusGas [;)]

Photos will follow of course, if there's interest.
 
On all cars i've ever done this on the allen key is the method to use (not done in on the 944 though). I wouldn't bother torquing this nut up with a torque wrench, just do it up 'pretty' tight. I've certainly never had anything strip on me. In any case 57 ftlb is not that high, I probably apply more torque via hand tightening. The only other way is to hold the strut stationary with a pipe wrench or similar. However this will score up the surface, make it susceptable to corrosion as you'll break the chrome plating, and possibly destroy your damper seal if the scored surface is within the working range of the damper shaft part that enters the damper unit.
 
Mine wouldn't undo on the car (the damper shaft just spun) but once the strut is off you can hold the top spring platform in a vice or similar and get the top nut off that way.

To put them back I think I got them as tight as I could off the car (holding the spring platform helped once the bolt was tight enough to hold it in place) and was then able to torque them up to somewhere around the right figure on the car. Keep an eye on them for the first few hundred miles but mine didn't loosen. No allen key sockets on mine as I've got top adjustable konis, but I could never get an allen key and socket to work together anyway.

As Scott says, don't try holding the damper shaft with anything as you'll wreck your nice new dampers..

Tim

 
You will need to take a socket that fits on the big nut and then grind 2 flats on to it, hold socket in place on strut with spanner, then use Allen key. Fairly easy really only problem we had was we just couldn't find a deep spanner that would fit down inside the top mount, hence why we ground 2 flats on to a socket, hey presto of it comes no problem.
 
You can get a 22mm socket with flats on from halfords, i believe it is a plug socket used this method when doing a Golf GTI springs,an allen key fits nicely down the middle.
 
... or use gooseneck spanners and an allen key down the middle. (Gooseneck - or swan-neck - spanners being one of those rather lovely old garage tools that are a delight to use, but which you hardly ever see any more. Much nicer to use than the more common 'combination' spanners as you are much less likely to take the skin off your knuckles if they slip, but there we are!)


Oli.
 

ORIGINAL: zcacogp

... or use gooseneck spanners and an allen key down the middle. (Gooseneck - or swan-neck - spanners being one of those rather lovely old garage tools that are a delight to use, but which you hardly ever see any more. Much nicer to use than the more common 'combination' spanners as you are much less likely to take the skin off your knuckles if they slip, but there we are!)


Oli.

This was why we ground 2 flats on a socket. My brother already had such a spanner that he used on many cars but it wouldn't fit down inside the top mount, we went and looked at a couple of others but they where no better.
 
Oh yes, and a socket post-angle-grinder-attack would do the job, but it's a bit of a ... brutal ... solution. Gooseneck spanners are an elegant solution, designed to overcome problems like that.

And I always find elegant solutions much more satisfying!


Oli.
 
ORIGINAL: Neil Haughey

This was why we ground 2 flats on a socket.

Snap.

Socket on the nut with flats ground for a spanner.

Rather than an allen key on the strut top I used one of these allen-key socket doo-dahs.
 
Never needing an excuse to buy toys & tools I bought a set of Vortex sockets, these are a tube socket that drives on the outside. Halfords sell them. The shaft is Torx not hex. The one I did on my AROs car were FT! The first we struggled to undo off the car the second we loosened before taking the strut off the car.
 
Long reach socket (if it is needed) or standard short reach, use plumbers pipe wrench on socket with allen key through 1/2" drive square - it will scratch the chrome/finish but thats not an issue
 
Funnily enough, just come across a good piccie of a gooseneck spanner being used as it should be, for a very similar job.

heathrobinson_2.jpg


No grinding, no scratched chrome, no fuss ...


Oli.
 
But alas not available in my local Halfords when I checked this morning. Still that's not the immediate problem having successfully sheared off the top eccentric bolt this morning.[:mad:]

But then it's been on there 17 years.
 
James,

Sorry, didn't realise it was you who had started the thread! You should have let me know you were getting on with the job - I've got a suitable set of spanners and would have very happily helped you wield them!

What suspension kit did you go with? I am assuming (from the fact that you are DIY-ing it) that it wasn't the KW's.

Sorry to hear about the broken bolt. Which one is it? The one at the bottom of the strut, bolting to the hub carrier?

When you get to it, take care with the spring compressors. They always give me a nasty case of the heebie-jeebies after I had one slip on me (and fire the Volvo suspension in question a hell of a long way down the street!)


Oli.
 
Right, all fitted up and looking very nice. Oli, thanks for the offer of help, but with a lack of space back home I've headed to the country to use the parent's driveway, so a long way from London. Your swan neck spanners would have been very useful though.

I had planned to go OEM Boge all round and that's what I ordered but then I was phoned two days later by Design 911 to be told that Boge no longer list the front S2 strut as OEM, but that they could supply me Porsche branded ones. Whether this is true, or a ruse to get me to spend more I have no idea, but that's what I got, Porsche fronts and OEM rears. So with all this talk of KWs and GAZ remote reservoirs, I thought it would be nice to show pictures of some "normal" stuff, and I can sleep soundly at night knowing I won't have to have the rear re-indexed.

So, here's the state of my nuts, which explains how I sheared the top eccentric bolt on the NS.

Frontsuspensionnuts.jpg


Now I'm not especially strong, so perhaps it's good that this failed now, rather than on the road, even if it's put me behind a day.

Although the bolt broke, it all came off fairly easily. Here's the state of the old ones. I don't know for sure, but I think that these are the original fit, meaning they've done 155k miles. They couldn't even support their own weight once off the car.

Frontsuspension_1.jpg


The top nut, was as predicted and advised, very tight, but after much swearing eventually came off. So here's the new struts, with the springs installed, although looking at them now I wish I had replaced the dust boots. Luckily the springs seem fine, certainly they sit at same height. In the end I put the top nut on as best I could with an impact driver, and I'll check tightness once they are fully installed on the car.

Frontsuspension_2.jpg


One other thing that was a pain was getting off the plastic fittings that hold the ABS gubbins on to the strut. They just broke, but presumably others who've done this just buy news ones. Here's a shot of the problem, and currently they are held on with cable ties, but that seems a bit of a fudge to me. Any thoughts?

Frontsuspension_3.jpg


The rears were much easier, other than needing a good crack on the bottom bolts to get them to budge. Photos of the old ones, presumed original too,

RearSuspension_1.jpg


And a new one installed, although Photobucket seems intent on showing it in the wrong orientation....

RearSuspension_3.jpg


All in all not bad for six hours work. Tomorrow's job, pads all round and front discs. Thanks all for the suggestions on top nut tightening strategies.
 
Keep up the good work James, I went through the same process on my S2 about 5 years ago (albeit I paid the local garage to do it) and the difference was night and day afterwards
 
James,
did i see a box there in the pics for a Clarke low reach aluminum trolley jack ? treat myself to one last year..............very nice !
 
Sounds like you had a very similar experience to me - I took the same route with OEM shocks and also snapped the camber bolt on one side [:D]

edit: and the ABS doo-dah! [8|]

Remember to get the geometry set afterwards.

The good news is your car will feel eleventy thousand percent better - mine certainly did.
 
ORIGINAL: Frenchy

James,
did i see a box there in the pics for a Clarke low reach aluminum trolley jack ? treat myself to one last year..............very nice !

You did, you did. My previous jack wouldn't fit under the S2, so I went on the hunt eventually tracking down one in the Old Street branch of Argos Extra. Odd really, you wouldn't think there was much call for trolley jacks in Zone 1. Anyway, wouldn't be without it now.

 
Six hours? That's damned fast work, batman! Well done. I spent a LOT more than that on mine! (In fairness I did the ARB bushes as well, and went for the Koni cut-and-shut front dampers, but still - you're doing well, sir!)

Looking very good. I reckon that if the original units lasted 150k miles then putting the same spec on to replace them is only a good thing. Good choice.

Two things to add.

1. DON'T THROW THE OLD FRONT UNITS AWAY! Someone will use them for a Koni job. (Fitting the koni units involves cutting those front dampers up and installing the new koni inserts inside them. If you have a spare pair of old dampers it makes the job a LOT easier as you can prepare a 'new' set of dampers before you start taking the old ones off the car, thus reducing the time the car is off the road for. Paul Smith was kind enough to lend me a set of his old dampers for this very purpose - a favour I remain grateful for - thanks Paul. So don't chuck your old dampers as someone will find them useful. And if you are short on storage space then I am happy to put them in my basement until someone wants them.)

2. DO get it geo'd. Changing the dampers means the wheels are pointing in every direction but the right one. When I did mine, having the geo set after fitting the new dampers made more difference than changing the dampers. Really. There are posts galore on here about the 'ideal' settings, but I can let you have the details of what mine is set to if you want (I headed for what are generally seen as being on the aggressive end of what you'd choose for road use, and I think it's superb.)

All the best with the brakes.


Oli.
 

Posts made and opinions expressed are those of the individual forum members

Use of the Forum is subject to the Terms and Conditions

Disclaimer

The opinions expressed on this site are not necessarily those of the Club, who shall have no liability in respect of them or the accuracy of the content. The Club assumes no responsibility for any effects arising from errors or omissions.

Porsche Club Great Britain gives no warranties, guarantees or assurances and makes no representations or recommendations regarding any goods or services advertised on this site. It is the responsibility of visitors to satisfy themselves that goods and/or services supplied by any advertiser are bona fide and in no instance can the Porsche Club Great Britain be held responsible.

When responding to advertisements please ensure that you satisfy yourself of any applicable call charges on numbers not prefixed by usual "landline" STD Codes. Information can be obtained from the operator or the white pages. Before giving out ANY information regarding cars, or any other items for sale, please satisfy yourself that any potential purchaser is bona fide.

Directors of the Board of Porsche Club GB, Club Office Staff, Register Secretaries and Regional Organisers are often requested by Club members to provide information on matters connected with their cars and other matters referred to in the Club Rules. Such information, advice and assistance provided by such persons is given in good faith and is based on the personal experience and knowledge of the individual concerned.

Neither Porsche Club GB, nor any of the aforementioned, shall be under any liability in respect of any such information, advice or assistance given to members. Members are advised to consult qualified specialists for information, advice and assistance on matters connected with their cars at all times.

Back
Top