Diver944
Active member
Most of you have probably guessed by now that one of my personal bugbears in the winter months is people with badly aimed headlights causing dazzle to other road users. Dan (Iceshark) has kindly sent me this aiming guide that anyone can use to adjust their headlights properly for best illumination of the road but without causing the oncoming driver to be squinting in pain. I'm assuming people know that the two screws either side of your headlight adjust the up/down and left/right aim [ ] All you need is some masking tape, a wall, and some chalk.....oh and a car:
Due to the very sharp definition of the E-Code low beam it is quite easy to aim the lenses without an optical aiming machine. Check tyre pressure, fill the petrol tank to the half way level and arrange to place weight or a person in the driver's seat equal to the most frequent driver.
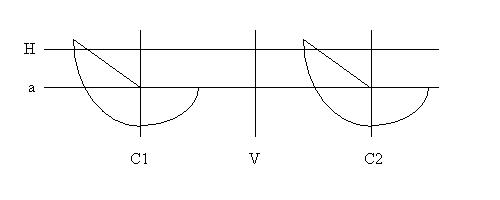
Locate the car on level ground with the headlights 25 feet from a wall or other vertical surface such as large cardboard boxes. Create the following aiming grid on the vertical surface with "H" being the geometric centre of each headlight lens off the pavement, "a" the horizontal aiming line which is discussed further, "V" the car's centreline, and "C1" and "C2" being the respective lenses' centrelines.
You may find it easiest to pull the car right up next to the wall, make your marks and then back the car off squarely for 25 feet. Sight through the rear window to line V to ensure you are lined up perpendicular. Numerous tricks can be employed to assist in this alignment sighting check such as having a helper hold a stick over the front badge as a forward sight post and tape on the center of the rear glass as the rear sight.
Adjust the beams so the horizontal cutoff is on aiming line "a" and the point of the flare up to the left is at the intersection of the respective lines "C1" and "C2" with line "a".
There is a trade-off in play with respect to the vertical aiming of the headlamps. On one hand, you do not want the declination angle too steep because the beam hot spot will intersect the ground at a shorter distance and reduce illumination travel down the road. On the other hand, you do not want the beam so high as to glare other drivers. Typical literature on aiming instruct that with the aforementioned vehicle loading that aiming line "a" be located 3" below the lens horizontal "H". Some people put in a full tank of fuel and a typical luggage load in the rear to simulate the highest upward angle the headlights will be subject to and aim just a hair under "H". Whichever height method you choose, make sure you don't glare other drivers. A test run is definitely in order if you are going to aim close to "H" so don't pull your target tape off the wall too quick and chalk mark where your tyres were.


