Menu toggle

Roof

markr

New member
Having just given my car a good valet I've noticed the rubber seal around the long plastic trim that a roof rack slots into seems to be lower in the gap on the nearside of the car than the offside one. I'd like to remove the seal and re-seat it so that it is more flush with the roof. Is this an easy job to do? Can anyone offer advice on how I do this?
Thanks
Mark
 
I haven't had the seal off but the long plastic strip (that goes from the back all the way to the front of the roof) just snaps off. If you get a flat nose screwdriver under one end of it to get it started then you can pull it off the rest of the way quite easily. There about 5 plastic clips in the roof that it then clips back into. You just need to put it on and give it a whack with your hand to get it back on.
 
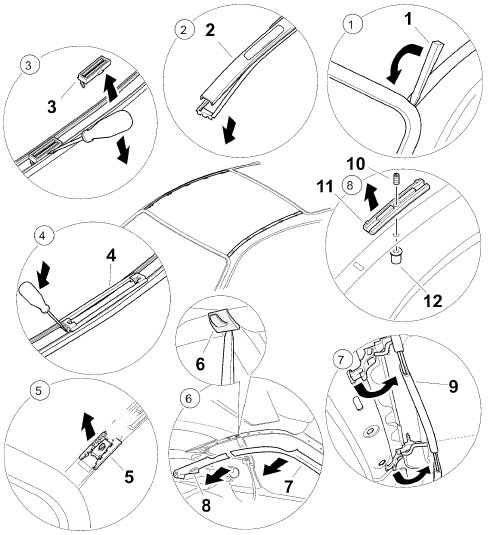
Grabbed this from renntech.org which should help you, although you only need to get as far as step 2....

1 Unclipping roof joint strip
Lift at both ends using a plastic spatula -1- and unclip all the way along.

2 Pulling off roof joint seal
Pull the roof joint seal out of the groove of the roof joint strip -2-.

3 Unclipping roof joint clips
On the outside of the roof joint clip -3- and roof joint strip, insert a narrow crewdriver in the centre and press the screwdriver outward until the roof joint clip disengages.

4 Unclipping fold-out element
Insert a screwdriver beneath both ends of the fold-out element -4-, and lever out.

5 Detaching spreader
Insert a plastic spatula into the wedge piece of the spreader -5- and push. Remove the spreader.

6 Removing interior trim parts
Lift up the clothes hook bracket -6- at the bottom with a plastic spatula and pull off. Pull away the A-pillar trim -7- and C-pillar trim -8- towards the inside and remove.

7 Detaching the roof liner
Unclip the metal strut -9- of the roof liner from the plastic clips.

8 Detaching base plate of Roof Transport System.
Release stud -10- from hexagon socket head bushing a/f 8 (micro-encapsulated) -12-. Remove the base plate -11- from the roof channel.


B5BDF715FC994F7A8ED62C567425D48B.gif
 
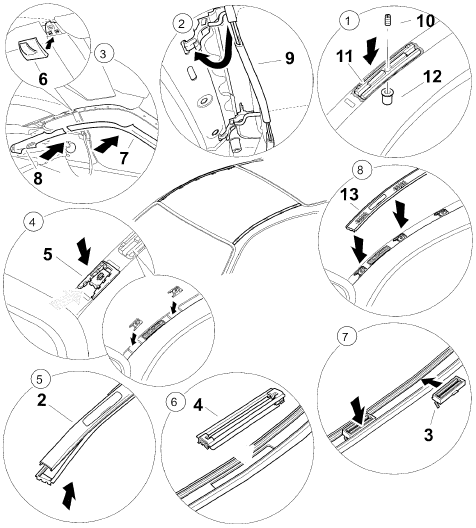
Here's the installation to get it back on. Again, you only need to start half way through this...

1 Fitting base plate of Roof Transport System
The contact surface of the base plate -11- must be free from dirt and grease. Position base plate of Roof Transport System in and parallel to roof channel parallel. Screw stud bolt -10- into hexagon socket head bushing a/f 8 -12- micro-encapsulated).

2 Attaching roof liner
Push the metal strut -9- of the roof liner into the plastic clips.

3 Fitting interior trim parts
Position and clip in A-pillar trim -7- and C-pillar trim -8-. Fit the clothes hook bracket -6-. The clothes hook bracket must be inserted into the aluminium bracket without the use of force, otherwise the aluminium bracket will be deformed.

4 Fitting spreaders
Position spreaders -5- (5 per roof channel in the recesses, beginning at the front. Press the spreader right down into the roof channel, and push the wedge piece into the spreader until the latter is braced in the roof channel.

5 Fitting roof joint seal
Push the roof joint seal onto the roof joint strip -2- all the way round.

6 Clip in fold-out elements
Position the fold-out element -4- in the cut-out of the roof joint strip, and press in the lugs at the ends until they lock into place.

7 Clipping in roof joint clips
Insert the roof joint clips -3- narrow side first and press in until the lug in the centre locks into place.

8 Fitting roof joint strip
Position the roof joint strip -13- over the roof channel, and align the roof joint clips in the roof joint strip with the spreaders so that they lie directly above one another. Push on the roof joint strip.


70C784929B0D4ACA9E302CF0DFF1BE85.gif
 

Posts made and opinions expressed are those of the individual forum members

Use of the Forum is subject to the Terms and Conditions

Disclaimer

The opinions expressed on this site are not necessarily those of the Club, who shall have no liability in respect of them or the accuracy of the content. The Club assumes no responsibility for any effects arising from errors or omissions.

Porsche Club Great Britain gives no warranties, guarantees or assurances and makes no representations or recommendations regarding any goods or services advertised on this site. It is the responsibility of visitors to satisfy themselves that goods and/or services supplied by any advertiser are bona fide and in no instance can the Porsche Club Great Britain be held responsible.

When responding to advertisements please ensure that you satisfy yourself of any applicable call charges on numbers not prefixed by usual "landline" STD Codes. Information can be obtained from the operator or the white pages. Before giving out ANY information regarding cars, or any other items for sale, please satisfy yourself that any potential purchaser is bona fide.

Directors of the Board of Porsche Club GB, Club Office Staff, Register Secretaries and Regional Organisers are often requested by Club members to provide information on matters connected with their cars and other matters referred to in the Club Rules. Such information, advice and assistance provided by such persons is given in good faith and is based on the personal experience and knowledge of the individual concerned.

Neither Porsche Club GB, nor any of the aforementioned, shall be under any liability in respect of any such information, advice or assistance given to members. Members are advised to consult qualified specialists for information, advice and assistance on matters connected with their cars at all times.

Back
Top