Some of you will remember a bit of discussion a while ago around these parts about rebuilding cylinder heads for an S2. My S2 is about to tick over 195,000 miles and, given concerns about both frilly head gaskets and lost ponies, I decided to take the plunge and get it done. I bought Ed's (edh on here) second-hand head that he had thoroughly ruined on his S2 track toy and had it rebuilt by Ivor Searle (http://www.ivorsearle.co.uk/) up near Cambridge. I can't remember the exact details of what they did but I think it was a case of a clean-up and re-face, 8 new exhaust valve guides, one or two new valves, re-built tappets, re-ground and lapped in valves plus a set of new valve springs plus probably a few other bits and bobs that I've forgotten. Tom (MonkeyThree on here) had his head done by Ivor Searle at the same time (in fact he found them and made the arrangements, as well as collecting my head and bringing it down to London for me - thanks Tom!)
I swapped my old head for the re-built one earlier on this week with the help of a friend who has a good workshop with air tools. It took the two of us a fairly long day, although we could have gone quicker had we not stopped for tea and biscuits and other distractions. There are some very good guides on how to do the job on the internet, mainly the various procedural write-ups on Clarks Garage (http://www.clarks-garage.com/) and the Porsche manuals (which every 944 owner should have - eMail me if you want a copy.) However there are some points that aren't covered in the guides, as follows;
- Undoing the six bolts on the two flange joints at the bottom of the exhaust headers has potential to be difficult but mine came away fairly easily. Thinking about it, they were removed when I took the exhaust off to do the clutch about 6 years ago so they weren't 25-years old. I soaked them as well as all the other fasteners in penetrating oil several times over the few days before the job to ensure that luck was on our side.
- The guides suggest that it's easier to remove (and re-install) the head with the exhaust headers still attached. As it was we removed the head with them attached but when it came to re-fitting time we put the headers back into the car and put the head back on the block and then bolted the two together. I think this was easier but your experience may be different.
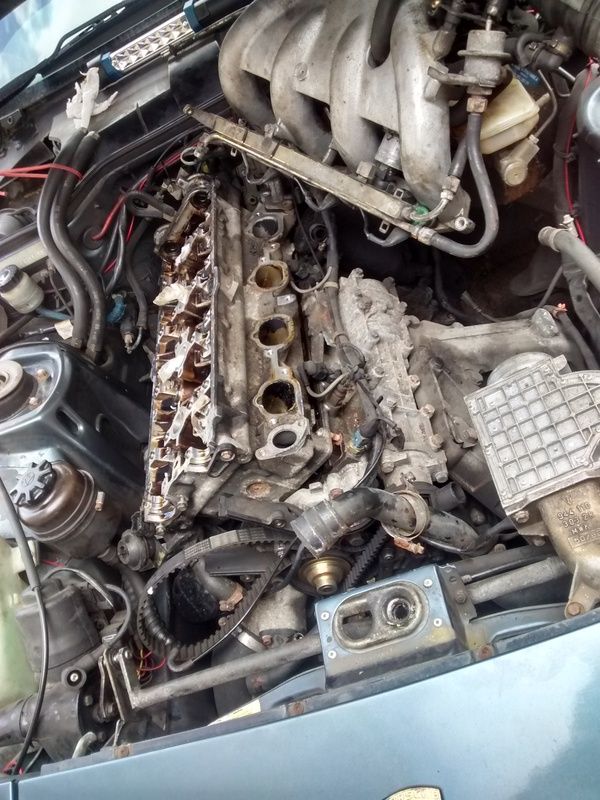
- The inlet manifolds are a pain because of the injector connections. I know that Tom struggled to get his injectors out of the inlet manifold and warned me of this advance. Mine felt fairly mobile but I couldn't for the life of me get the electrical connections out of two of them, despite removing the U-shaped wire clip. I therefore left them attached and simply lifted the inlet manifold out of the way, resting it on the brake servo - like this:

- In order to get the rearmost inlet manifold bolt off you need to take the fuel rail off OR remove the Fuel Pressure Regulator from the end of the fuel rail. This is a fiddly job although not difficult.
- There is an elusive 11th head stud which isn't mentioned in the manuals. This is at the front of the head on the right hand side and seems to be placed there to help seal one of the waterways. You can see it easily with the engine built up but you can't access it at all well with the inlet manifold in place. Even with the inlet manifold removed it is a nuisance to get to the nut on it as there is too little clearance around it to get a tool over it - none of the 13mm ring spanners we had between us would go over it. We eventually gripped it with a mole wrench to loosen it and replaced it with a new nut, done up as best we could with an open-ended spanner.
- You need to take the cams out of the old head to get to the nuts on the head studs. This isn't hard but you need a good-quality 10mm triple-head tool to get the bolt out of the end of the camshaft. The various guides will talk you through the procedure.
- I turned the engine to TDC on Cyl#1 and marked the cam-belt-to-cam-pulley position with some tipp-ex before dismantling the engine and then replaced the belt and pulley in the same position when re-building it. However I checked the engine timing before starting it up and found out that I was out by one notch on the cam belt. I don't know how this happened but presume we slipped the belt on the crankshaft pulley without realising it. Thankfully I spotted the error and we corrected it before any harm was done.
- We turned the engine over for 10-15 seconds or so with the king lead disconnected once it was built-up to get some oil around the head. Once the king lead was connected it fired immediately and ran very well - it was smooth and had an excellent idle. However the tappets were VERY noisy indeed - noisy to the point that conversation next to the car was impossible with it idling. We left it to idle for 15-20 minutes or so and they improved only fractionally. I took advice from a few people on this, including Tom who had fitted his new head to his S2 a couple of weeks before, and it appears this this is normal. I drove my car to the local petrol station to put some juice in it and almost all of the tappets very suddenly became silent about 1/2 mile into the journey. There was still one ticky one, but this has silenced itself on a subsequent 70-80 mile journey.
- It's worth checking the oil level after you've started the car with the new head as you lose a good few hundred millilitres in the old head when you remove it.
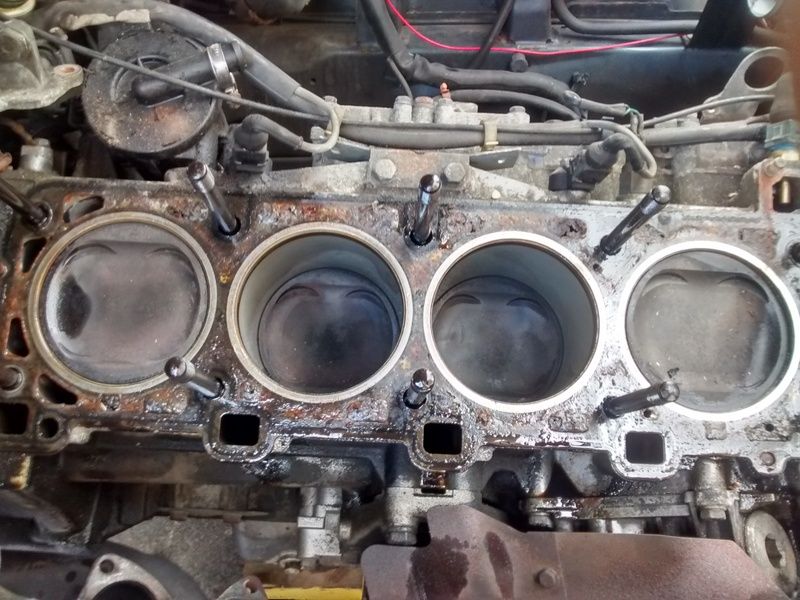
For reference, here are some shots of the old head gasket. I can see what people say when they talk about it not sealing the waterways well after a time but I don't think it's as bad as people make it out to be. Sorry for the poor pictures but this is from an engine with 195,000 miles on it.
Bigger view:

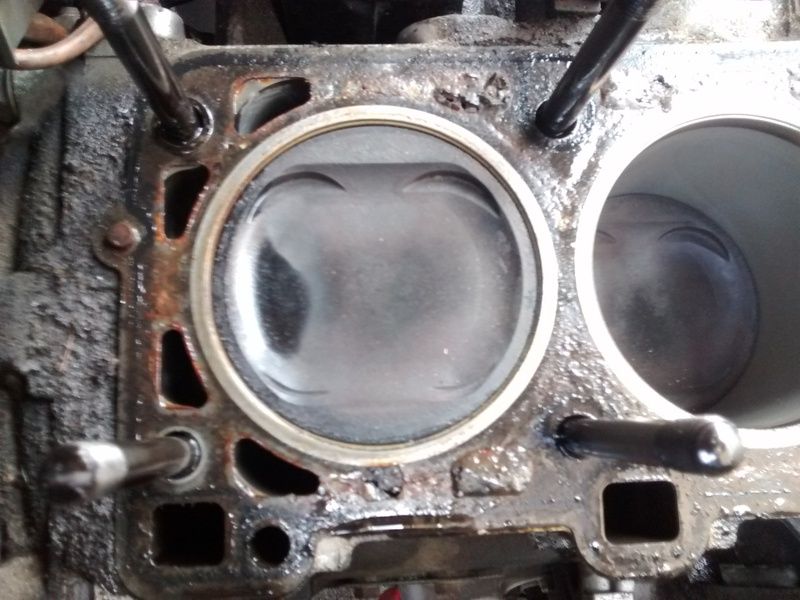
Detail of Cyl#4 (the one that commonly suffers)

Although I didn't compare with the new head gasket I assume that the four holes on the left hand side around the cylinder are meant to be there and you can see that the one to the top right of the cylinder is getting a little porous. However it is still largely in place and I can't think that it would bleed much water from top to bottom.
When I looked at the tops of the cylinder bores I could detect no measurable wear on them - there was no step that I could feel with my fingertips nor could I see anything when I put a straight edge against it. The bores were all perfect, with no scuffing or scoring - which I was both impressed by and pleased with.
Since the work has been done the car is slightly smoother and quieter to drive. I'm not sure whether it has any more pep or not as I've yet to drive it hard with the new head. It may run slightly cooler than before but I'm not convinced, and it may have slightly better oil pressure than before but I'm not entirely convinced by that either. It ran perfectly well before and the work done was mainly preventative maintenance, so I'm not expecting any great improvements from it.
If anyone is planning to tackle this job and wants more advice then do PM me. I know that Tom S (tommys86) and Rob (robdimond) may be planning head-off work on their S2's in the near future so hopefully this will be helpful for them.
Oli.
I swapped my old head for the re-built one earlier on this week with the help of a friend who has a good workshop with air tools. It took the two of us a fairly long day, although we could have gone quicker had we not stopped for tea and biscuits and other distractions. There are some very good guides on how to do the job on the internet, mainly the various procedural write-ups on Clarks Garage (http://www.clarks-garage.com/) and the Porsche manuals (which every 944 owner should have - eMail me if you want a copy.) However there are some points that aren't covered in the guides, as follows;
- Undoing the six bolts on the two flange joints at the bottom of the exhaust headers has potential to be difficult but mine came away fairly easily. Thinking about it, they were removed when I took the exhaust off to do the clutch about 6 years ago so they weren't 25-years old. I soaked them as well as all the other fasteners in penetrating oil several times over the few days before the job to ensure that luck was on our side.
- The guides suggest that it's easier to remove (and re-install) the head with the exhaust headers still attached. As it was we removed the head with them attached but when it came to re-fitting time we put the headers back into the car and put the head back on the block and then bolted the two together. I think this was easier but your experience may be different.
- The inlet manifolds are a pain because of the injector connections. I know that Tom struggled to get his injectors out of the inlet manifold and warned me of this advance. Mine felt fairly mobile but I couldn't for the life of me get the electrical connections out of two of them, despite removing the U-shaped wire clip. I therefore left them attached and simply lifted the inlet manifold out of the way, resting it on the brake servo - like this:

- In order to get the rearmost inlet manifold bolt off you need to take the fuel rail off OR remove the Fuel Pressure Regulator from the end of the fuel rail. This is a fiddly job although not difficult.
- There is an elusive 11th head stud which isn't mentioned in the manuals. This is at the front of the head on the right hand side and seems to be placed there to help seal one of the waterways. You can see it easily with the engine built up but you can't access it at all well with the inlet manifold in place. Even with the inlet manifold removed it is a nuisance to get to the nut on it as there is too little clearance around it to get a tool over it - none of the 13mm ring spanners we had between us would go over it. We eventually gripped it with a mole wrench to loosen it and replaced it with a new nut, done up as best we could with an open-ended spanner.
- You need to take the cams out of the old head to get to the nuts on the head studs. This isn't hard but you need a good-quality 10mm triple-head tool to get the bolt out of the end of the camshaft. The various guides will talk you through the procedure.
- I turned the engine to TDC on Cyl#1 and marked the cam-belt-to-cam-pulley position with some tipp-ex before dismantling the engine and then replaced the belt and pulley in the same position when re-building it. However I checked the engine timing before starting it up and found out that I was out by one notch on the cam belt. I don't know how this happened but presume we slipped the belt on the crankshaft pulley without realising it. Thankfully I spotted the error and we corrected it before any harm was done.
- We turned the engine over for 10-15 seconds or so with the king lead disconnected once it was built-up to get some oil around the head. Once the king lead was connected it fired immediately and ran very well - it was smooth and had an excellent idle. However the tappets were VERY noisy indeed - noisy to the point that conversation next to the car was impossible with it idling. We left it to idle for 15-20 minutes or so and they improved only fractionally. I took advice from a few people on this, including Tom who had fitted his new head to his S2 a couple of weeks before, and it appears this this is normal. I drove my car to the local petrol station to put some juice in it and almost all of the tappets very suddenly became silent about 1/2 mile into the journey. There was still one ticky one, but this has silenced itself on a subsequent 70-80 mile journey.
- It's worth checking the oil level after you've started the car with the new head as you lose a good few hundred millilitres in the old head when you remove it.
For reference, here are some shots of the old head gasket. I can see what people say when they talk about it not sealing the waterways well after a time but I don't think it's as bad as people make it out to be. Sorry for the poor pictures but this is from an engine with 195,000 miles on it.
Bigger view:

Detail of Cyl#4 (the one that commonly suffers)

Although I didn't compare with the new head gasket I assume that the four holes on the left hand side around the cylinder are meant to be there and you can see that the one to the top right of the cylinder is getting a little porous. However it is still largely in place and I can't think that it would bleed much water from top to bottom.
When I looked at the tops of the cylinder bores I could detect no measurable wear on them - there was no step that I could feel with my fingertips nor could I see anything when I put a straight edge against it. The bores were all perfect, with no scuffing or scoring - which I was both impressed by and pleased with.
Since the work has been done the car is slightly smoother and quieter to drive. I'm not sure whether it has any more pep or not as I've yet to drive it hard with the new head. It may run slightly cooler than before but I'm not convinced, and it may have slightly better oil pressure than before but I'm not entirely convinced by that either. It ran perfectly well before and the work done was mainly preventative maintenance, so I'm not expecting any great improvements from it.
If anyone is planning to tackle this job and wants more advice then do PM me. I know that Tom S (tommys86) and Rob (robdimond) may be planning head-off work on their S2's in the near future so hopefully this will be helpful for them.
Oli.


