Menu toggle

removing S2 cill trim

ORIGINAL: appletonn

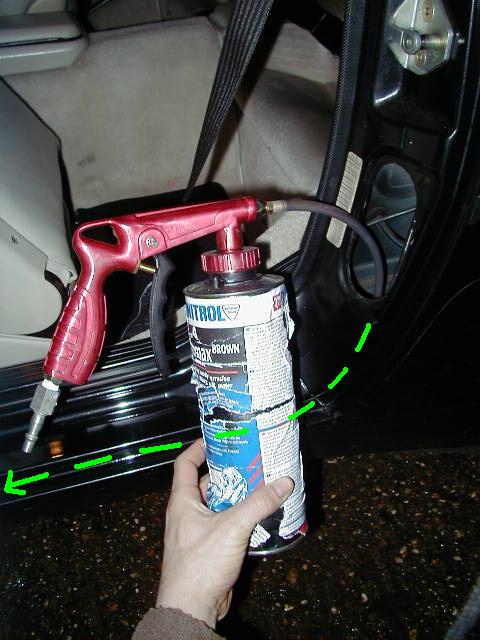
[8|]I too bought the Dintrol stuff from Frost but also bought some small bore silicone tubing (about 1.5M was enough) and swapped the brass spray nozzle and the brass 'trigger button' piece from the supplied extension hose
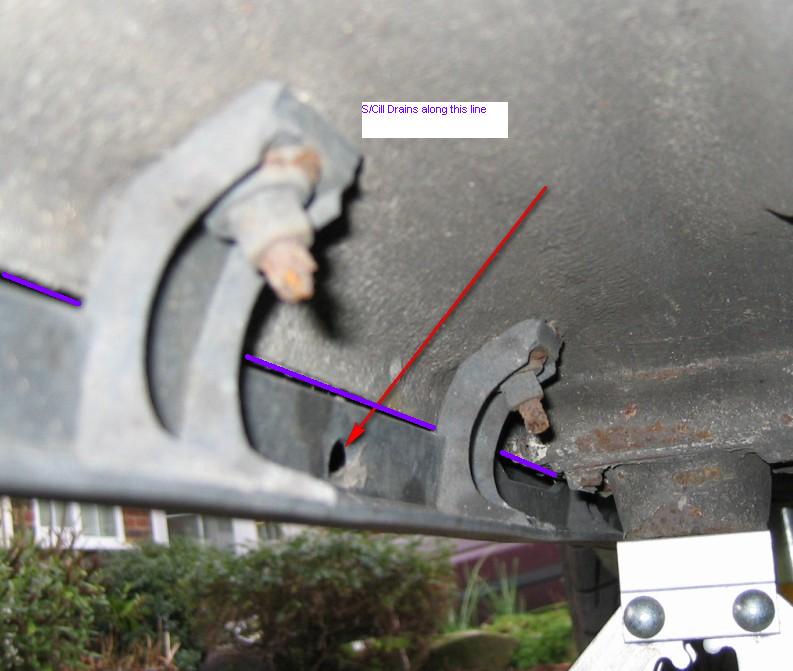
Hmmm that's a good idea, I like your thinking. I have some spare silicon tube that I will try first using your method. As long as I can push it to the very front of the sill from the rear vent hole I can't see where we can go wrong. Saves peeling the carpet back and messing around with bungs [:)]
 
I actually wrapped some thin wire round the silicon where the brass spraying nozzle fits into the silicone and then fed both tubing and wire into the sill - the added stiffness of the wire helped to direct the tubing to the end of the sill. I certainly had plenty of Dinitrol leaking out from along the full length of the sill, so hopefully I hit the spot!

[:D]
 
ORIGINAL: Diver944
Saves peeling the carpet back and messing around with bungs [:)]
I thought that the bungs allowed you to access the inner cills, whereas poking a pipe along the vent holes only got to the outer cills?

Or am I confused? (Too much thinking about bikinis addles the brain.)


Oli.
 
I thought that the bungs allowed you to access the inner cills, whereas poking a pipe along the vent holes only got to the outer cills?

Surely the outer cill and the inner cill create the void we're talking about filling? You're treating the inside of both panels.

Of course, the outside of the outer cill is the bit with the bobbly Wurth on so you can treat that if it's damaged.

That leaves the outside of the inner cill, which is under the car and undersealed. Unless you have the "delete underseal" option.....[&:]
 
ORIGINAL: zcacogp

access the inner cills, whereas poking a pipe along the vent holes only got to the outer cills?

The bungs by the seat give direct access to the void between the outer sill and inner sill. The access vent at the back of the door jamb leads to the same void, but you need to bend your lance through 180 degrees and then push it along the void.

(a diagram would be so much better here - time to photoshop the pics of Peter Empsons cutaway [:D] )
 
Paul,

Thanks ... I think we have a terminology issue here.

There is an inner and an outer cill ... is the inner cill the bit that is visible on the inside of the car (well, not visible, but the bit of tin behind the carpet)?

The outer cill is clearly the bit that forms the outside of the car.

I was (possibly mistakenly) under the impression that there was a third bit of metal involved, that sat between the outer cill (the bit on the outside of the car), and the bit of tin behind the carpet. This was clearly not visible (it was entirely enclosed), and was being referred to as the inner cill.

If there are only two (inner - behind the carpet, and outer - outside of the car) then there are numerous ways to access the void between them; drain hole at the back end (at the front of the rear wheel arch), drain holes all along the bottom of it, or through the vent at the back of the door aperture.


Oli.
 
How does the the dinotrol 'leak out' after you had finished injecting the sill? I thought the sills were fully enclosed sealed sections?

Drain holes along the bottom. Visible on a Lux, but are they hidden on the S2/Turbos by the trim?

Make sure they are clear after treating the inside of the cill. Or sill! [:)]
 
ORIGINAL: sc0tty

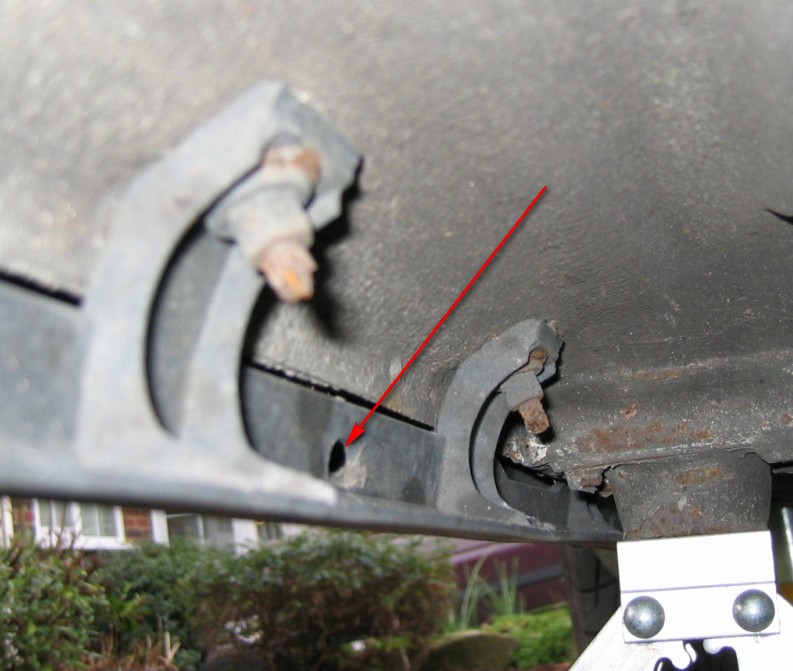
Thanks Paul, looks like I will have to remove the plastic sill stone guards to find these holes, I have never noticed them before.
No need to remove the trims - just poke youtr head right 'round underneath them. You'll see them.

If you put wax in the c/sill you'll see them quite a lot more quickly as the wax gushes out of them!


Oli.
 
That's the stuff - comes in a large aerosol and is very easy to apply.... ...especially to yourself![:D]


I just didn't fancy removing carpets etc to get at the bungs and doing it the way i did, I still seem to have got to all/most of the sill, judging by how much dripped out of all of the drain holes all the way along!

Doesn't even smell too bad either and the aerosol makes it very simple, once you got your nozzle to the farthest extremities, ooh err Missus!


Have fun!

Cheers
 
ORIGINAL: sc0tty

This must be it then:

FE381212E78A4223B3BB6D5805498D49.jpg
Scotty,

That's not the right hole. That is a hole that leads into the trim, not into the s/cill.

I've edited your piccie to try and show where the holes will be - they are along the seam between the two halves of the sill, and look like gaps in the seam - it sort of flares out on each side to produce a gap. This gap is the drain hole.

The picture shows the line that the drain holes will be on, in purple. There aren't any in the piccie, but look forwards and backwards along the seam and you'll see them.


Oli.


0E8C8FE0EF4441828EF4DB2F12802F59.jpg
 
Scotty, that is actually a drain hole in the plastic sill guard.

The sill drains themselves are oblong shaped. IIRC there are four of them along the sill. You do need to remove the trim to see them and they are too narrow for effective spraying. I sprayed Dinitrol 3125 into mine easily as recommended on here by using a 1 metre extension tube fed into the sill by bending it 90 degrees through the access vent just below the door lock at the back of the B pillar.

I think it's best to remove the plastic trim so that an assistant (a mug) can double check you have pushed it far enough along the sill


373BF546DD0049BA8E46CFE4634F10A4.jpg
 
I obviously have time on my hands as here is a pic hastily taken just now to show exactly the access point we mean. The expertly drawn green line shows the extension hose bent back inside the sill. I have a compressor and spray gun to do it but the aerosol cans sold by Frosts are just as good

7D2C21FAC524425F8C21C8C8B99D0CCD.jpg
 
Ok chaps, So far good advice on how to get the "gloop" stuff into the cills..
BUT
If "one" was to try + get the plastic cill trims off + snapped the lugs that held it in place, how would "one" then re-fit the trims.???
Anybody been there , done that + got the T shirt....
OR am i going to be the first one....[ Im sure others have been in this situation...]...
Can the lugs be drilled out + a bolt pushed through from the inside of the car.???
 
Hmmmmm now that one I'm not sure about [&:]

From underneath they are covered in gloop so it's not clear, and from inside I believe they will be under the carpet which I have not lifted.
 
Several of the plastic lugs/ rusty threads siezed up and sheared when i removed my cars sill trims. Still not back on. I might grind the remains of the rusty studs flush to the floor and use self tapping sheet metal screws with washers to fix the plastic sill trims back on.

I also use am air powered schutz gun and wax lance to apply Dinitrol into the sills much in the same way as Diver has illustrated.
 

Posts made and opinions expressed are those of the individual forum members

Use of the Forum is subject to the Terms and Conditions

Disclaimer

The opinions expressed on this site are not necessarily those of the Club, who shall have no liability in respect of them or the accuracy of the content. The Club assumes no responsibility for any effects arising from errors or omissions.

Porsche Club Great Britain gives no warranties, guarantees or assurances and makes no representations or recommendations regarding any goods or services advertised on this site. It is the responsibility of visitors to satisfy themselves that goods and/or services supplied by any advertiser are bona fide and in no instance can the Porsche Club Great Britain be held responsible.

When responding to advertisements please ensure that you satisfy yourself of any applicable call charges on numbers not prefixed by usual "landline" STD Codes. Information can be obtained from the operator or the white pages. Before giving out ANY information regarding cars, or any other items for sale, please satisfy yourself that any potential purchaser is bona fide.

Directors of the Board of Porsche Club GB, Club Office Staff, Register Secretaries and Regional Organisers are often requested by Club members to provide information on matters connected with their cars and other matters referred to in the Club Rules. Such information, advice and assistance provided by such persons is given in good faith and is based on the personal experience and knowledge of the individual concerned.

Neither Porsche Club GB, nor any of the aforementioned, shall be under any liability in respect of any such information, advice or assistance given to members. Members are advised to consult qualified specialists for information, advice and assistance on matters connected with their cars at all times.

Back
Top