Menu toggle

Started.... S2 Clutch Replacement

zcacogp said:
Tom,

Don't mistake the first rule of sales; the cost of the item for the supplier to buy has no bearing on the price they sell it at; that is determined solely by what someone is willing to pay ....

I'm going to go out on a limb and say I probably wouldn't go with the short-shift kits.

Stay away from the paint. It takes time, costs money and adds weight. And no-one will see it underneath the car. [:)]

Oli.

Really ? "The price of goods is determined solely by what someone is willing to pay" ???

The cost of any item + all the running expenses of any business determines what price they HAVE to sell it at to

to make a Gross profit. The Profits are then used to pay for everything to run the show (Staff, Overheads etc..)

Whats left is called the NET Profit.

It's this bit which differs from one product to the next and also from One industry to another, some products and services

have vastly higher profit margin percentages, others are much lower and you only have to look at all the biggest Multi Millionaires in the world to see which Industries they dabble with because they are highly profitable.

The only way anything is priced high and still sells well is determined by the market,not what people are willing to pay.

Many highly profitable Products are marketed so well, the consumer has no idea somebody is making a lot of margin from them

and they think they are getting a good Deal! This is the ultimate goal for any business to essentially "Trick" consumers that they

are not ripping them off! but actually helping them out !

Tom's 944 S2 is a Racing car and will benefit in this sport from a shorter shifting throw.

R

 
924Srr27l said:
The only way anything is priced high and still sells well is determined by the market,not what people are willing to pay.
"The market" & "what people are willing to pay"

They are the same thing. Please let's not have a long debate about economic theory & let's get back to clutches...

 
Hi Steve - I'm probably going to pass on the mount thanks - the extra budget been blown on the new flywheel and try the goo trick.

I've managed to get the flywheel off as my new bits have arrived today. Concern about removing the pilot bearing though - the slide hammer I have is too big to get it square to the crank palm - before I go down the route of getting it modified/shorten does anyone else have a better technique for removing? Bearing feels ok but guess whilst I'm here I should.

Oh speaking of mods - I'm going to get my housing "notched", seen a few online which are the two sensor setups so think my proposal is fine as I want a bit more wriggle room on the 1 sensor setup.

Red lines mark the basic cuts to enable me to slide the housing on with sensor fitted - think this is the normal approach.

Orange lines is the additional wriggle room - I want create clearance for the dowel fitting (blue arrow) in order to remove the sensor whilst the housing is in place - why? Mainly because my sensor is fused to the bracket, plus if the sensor is damaged or faulty in future is an easier swap out - any concerns or anyone had similar thoughts?

Cheers Tom

 
Never tried it, but supposedly filling the pilot bearing with grease and then hammering in a close fitting bar forces out the bearing. Google it.

 
Tommys86 said:
Hi Steve - I'm probably going to pass on the mount thanks - the extra budget been blown on the new flywheel and try the goo trick.

I've managed to get the flywheel off as my new bits have arrived today. Concern about removing the pilot bearing though - the slide hammer I have is too big to get it square to the crank palm - before I go down the route of getting it modified/shorten does anyone else have a better technique for removing? Bearing feels ok but guess whilst I'm here I should.

Oh speaking of mods - I'm going to get my housing "notched", seen a few online which are the two sensor setups so think my proposal is fine as I want a bit more wriggle room on the 1 sensor setup.

Red lines mark the basic cuts to enable me to slide the housing on with sensor fitted - think this is the normal approach.

Orange lines is the additional wriggle room - I want create clearance for the dowel fitting (blue arrow) in order to remove the sensor whilst the housing is in place - why? Mainly because my sensor is fused to the bracket, plus if the sensor is damaged or faulty in future is an easier swap out - any concerns or anyone had similar thoughts?

Cheers Tom

All makes sense to me - wish I'd done mine..

 
There is a very easy way of getting the bearing out.

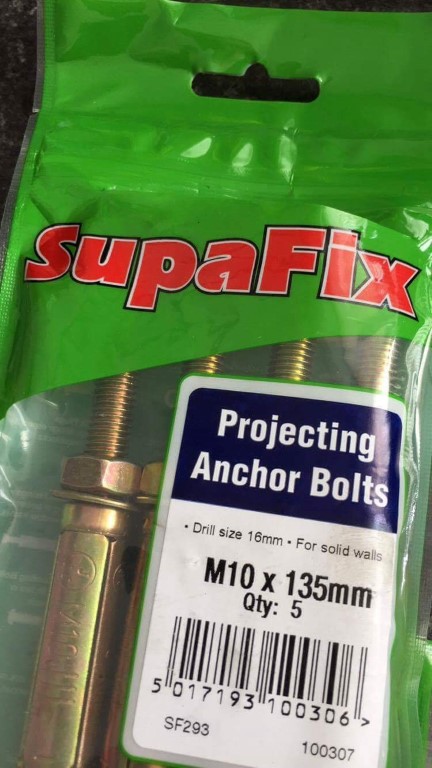
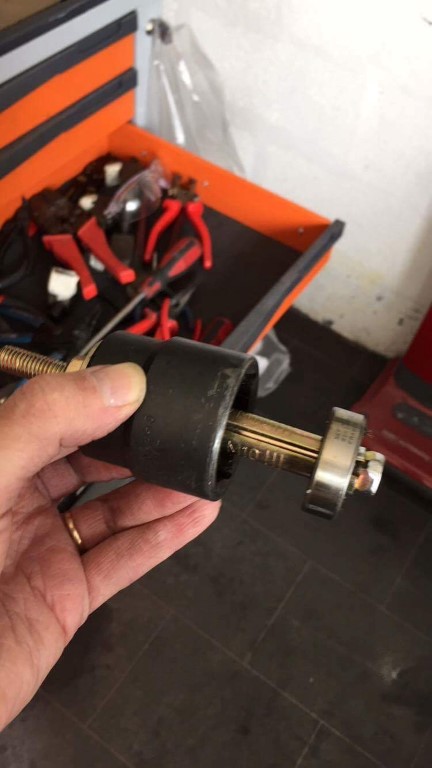
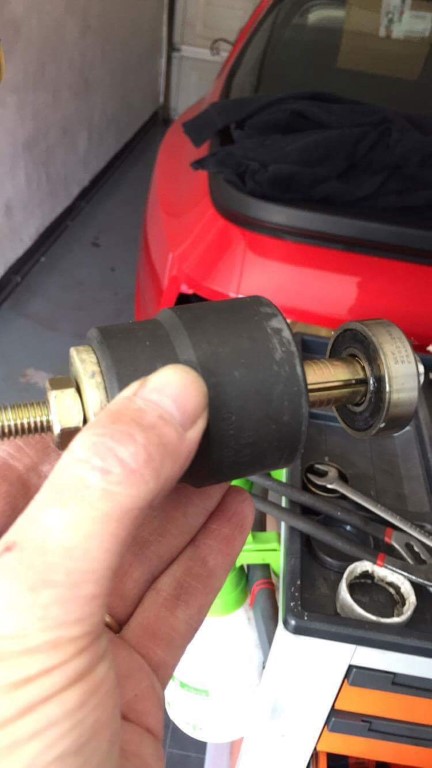
Buy a 10mm anchor bolt, take the wire off it, remove one of the 4 split pieces , put the wire back on, this should now fit through the pilot bearing, nip up the nut and the three remaining 'legs' expand behind the bearing, grip the thread with pliers and a tap with a hammer pulls the bearing. Basically it's a cheap small bearing puller.

This is how I did mine and it was out in minutes.

cheers, Paul

 
I forgot to add you need to use a large socket as a spacer to pull the bearing into, I have 3 photos that show the "tool" in action but I'm rubbish at posting photos, I can email them to someone if they would post them on here ?

 
Paul - like your idea. I have shorten my slide hammer but the hook on it seems to spread / bend out rather than tug the bearing out! You can email your pics to my account and Il add them - tommy.simo86@gmail.com

I'm picturing something attached below (using my rushed Excel art skills!)... possibly with the nut on the inside of the large socket? rather than as pictured on outside?

 
PAUL RUDDY said:
I forgot to add you need to use a large socket as a spacer to pull the bearing into, I have 3 photos that show the "tool" in action but I'm rubbish at posting photos, I can email them to someone if they would post them on here ?

Send them over to me, I will post them

martins@evolve-online.com

 
PRimage1.JPG
Pictures From Mr Ruddy.......

PRimage1.JPG


PRimage2.JPG


PRimage3.JPG


blade7 said:
Never tried it, but supposedly filling the pilot bearing with grease and then hammering in a close fitting bar forces out the bearing. Google it.
That is how i did mine and remember being surprised how easy it was, (well filling the void behind the bearing with grease),

Tony

 
173015d1172025709-speed-and-ref-sensor-clutchmod.jpg
borrowed from rennlist, but I am pretty sure that is what mine looks like too, dont see any problems with your 'single sensor' cut

 
Thanks for the support Ruddy & Waylander! Apologies I've been radio silent for a week or so... good news - most of it is back together. Housing is on, been bleeding the hydraulics and stumbled across a puzzling setup...

We had an issue whereby the pedal would sometimes not fully return and whilst pumping the clutch noticed at first it was very bad (obviously loads of air in the system) but then decided to look at the pedal assembly and it seemed when it comes back up it would 'clunk' back into a position. Best way I can describe it is the helper spring compresses (upon return) then pushes outwards & upwards into the roof of the footwell.

Comparing to my road car seems like I'm missing a part? Does anyone else know if they have a clutch pedal stop? (returning upwards?) Seems my road car pedal stops earlier because I have a little stop pad it hits.

Thinking my only way road this is to glue (with something seriously strong) a large pad to stop the pedal returning too far?

Red arrows - what's missing.

Orange arrows - the force direction when it clunks.

Also notice I don't have a return spring like the diagram but never does my road car - however read this is an older or new reversion.

 
Tom,

Would have been helpful if both pictures were the same way round.

I've just rotated it, and can see it now.....

Yes I think we need to put something there to prevent the pedal going "over centre" on the spring.

Dad

 
[attachment=Vol2x-tranmission.png]

there is no stop.

it all needs adjusting,

clarkes garage is the place to go

You cannot get a tape measure in there, i used a couple of pre cut wooden kebab sticks to get the length's right

take the drivers seat out, makes it so much easier

 
Martin,

I think you may be close to identifying the problem we've got with the clutch pedal.

When it's released it normally would be level with the brake pedal, but now, Tom's got it back together, the pedal only returns to a position about 3-4 cms below the brake. If you hook your foot underneath it, it returns with a snap, to the brake pedal level.

However next time you depress the clutch, it travels about 3cms before it starts to resist properly and start pushing against the hydraulics.

I think it's the 0.5 cm clearance (shown on the clarks diagram) on the actuator in the master cylinder thats too big , any ideas?

Gerry


Posts made and opinions expressed are those of the individual forum members

Use of the Forum is subject to the Terms and Conditions

Disclaimer

The opinions expressed on this site are not necessarily those of the Club, who shall have no liability in respect of them or the accuracy of the content. The Club assumes no responsibility for any effects arising from errors or omissions.

Porsche Club Great Britain gives no warranties, guarantees or assurances and makes no representations or recommendations regarding any goods or services advertised on this site. It is the responsibility of visitors to satisfy themselves that goods and/or services supplied by any advertiser are bona fide and in no instance can the Porsche Club Great Britain be held responsible.

When responding to advertisements please ensure that you satisfy yourself of any applicable call charges on numbers not prefixed by usual "landline" STD Codes. Information can be obtained from the operator or the white pages. Before giving out ANY information regarding cars, or any other items for sale, please satisfy yourself that any potential purchaser is bona fide.

Directors of the Board of Porsche Club GB, Club Office Staff, Register Secretaries and Regional Organisers are often requested by Club members to provide information on matters connected with their cars and other matters referred to in the Club Rules. Such information, advice and assistance provided by such persons is given in good faith and is based on the personal experience and knowledge of the individual concerned.

Neither Porsche Club GB, nor any of the aforementioned, shall be under any liability in respect of any such information, advice or assistance given to members. Members are advised to consult qualified specialists for information, advice and assistance on matters connected with their cars at all times.

Back
Top