Menu toggle

what did you do to your 944 today

Did you also get the 1/4 spanner in the kit, Dave? Both our 924S's seem to have smooth tight gearchange mechanisms despite the better one just going over 100k & my track car 93K-unless were not changing gear slickly enough my impressions from here are that the equivalent 994's seem to have more niggly problems than the 924S's despite the 924S's being faster & more nimble.[;)][:)]
 
Polished the cookie cutter rims, traced an oil leak to the oil pressure sender switch ................ then went out for a thrash - Luv It[:D]
 
ORIGINAL: ALZ 1933
ORIGINAL: colin944 Think I may finally solved my fuel pipe replacement worries.Have replaced everything with proper goodridge hose and crimped ends. Fingers crossed.........
Any pictures? This is a job I'll be tackling once the weather improves a bit. Did you get them made up locally & could you give me an indication of the price?
I used goodrigde 3/8th ptfe braided hose with standard bsp 3/8th ends and metric adapters for the fuel rail. The filter takes a 3/8th bsp fitting and the return line I changed to bsp fittings. I made the hoses up to go from the fuel filter to the fuel rail on the engine and back to the tank. I put a break in each line just under the floor at the engine end. I crimped all the ends myself using a hydraulic crimpper I borrowed from a mate who used to work for a hydraulic company .I spent a lot of time trying to do this and it cost me more than it would have to buy standard steel lines. But I wanted something which would last longer than the car and be easy to fix without dropping the rear beam. The major problem I had was finding someone who understood what I was trying to do. I spent a whole load of cash and time on buying products from companies that claimed to know what they were doing but could not understand what I was doing. The I took the fuel rail off and took it to a local hydraulic company who instantly gave me what I wanted.The hose it's self was £25 a meter with the ends etc costing pennys. I recon I could do it again for around £150. But I must have wasted £100 on stuff that didn't work . But that's the fun of trying to do something yourself. I'll take some photo's and do a how to at some point.
 
Oil change and filter, fitted K&N filter with nut on top, next time won't need to do the screwdriver and hammer trick. Just had new tyres fitted so while the wheels are off a really good clean and waxed the inside of the rims, sad or what.
 
Succeeded in dismantling the hatch lock so it now won't work ... one of the rods has now popped out so a bit of crawling around and further lash ups are required ... When the key turns with no resistance, I presume it is supposed to activate that microswitch which moves the rods and the thing pops open? The key turns and nothing happens atm ...
 
Fitted new CV boot. Used a VW T25 boot fits like a glove. Thinking about trying a VW t25 cv joint against mine to see if they are the same. Anyone know the answer ?
 
Looking good Andrew, [;)], you've certainly been putting some polishing time in ! Sorry to hear you're still having water leak issues, I honestly thought I'd cured it - this problem seems to be so common on the 944 but it's never one definitive area [8|] I still have the picture I took of her when we were out in the country one day which is the screen background on my laptop, the front and front three quarter view of her looks really mean and powerful. Keep up the good work ! Norm
 
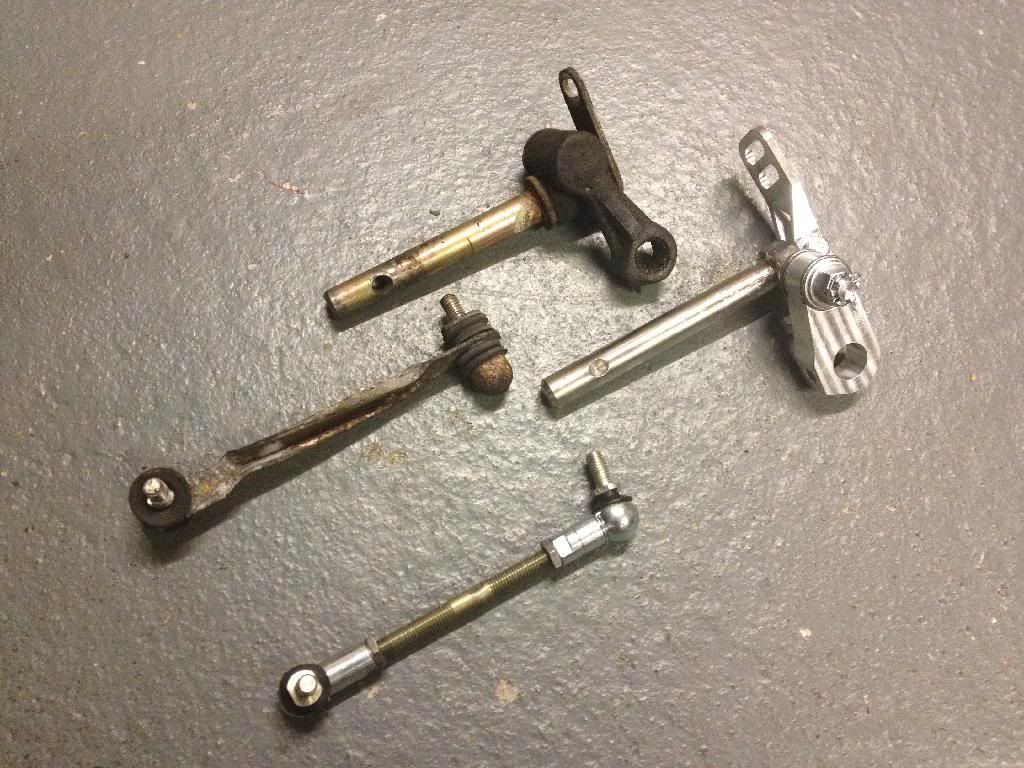
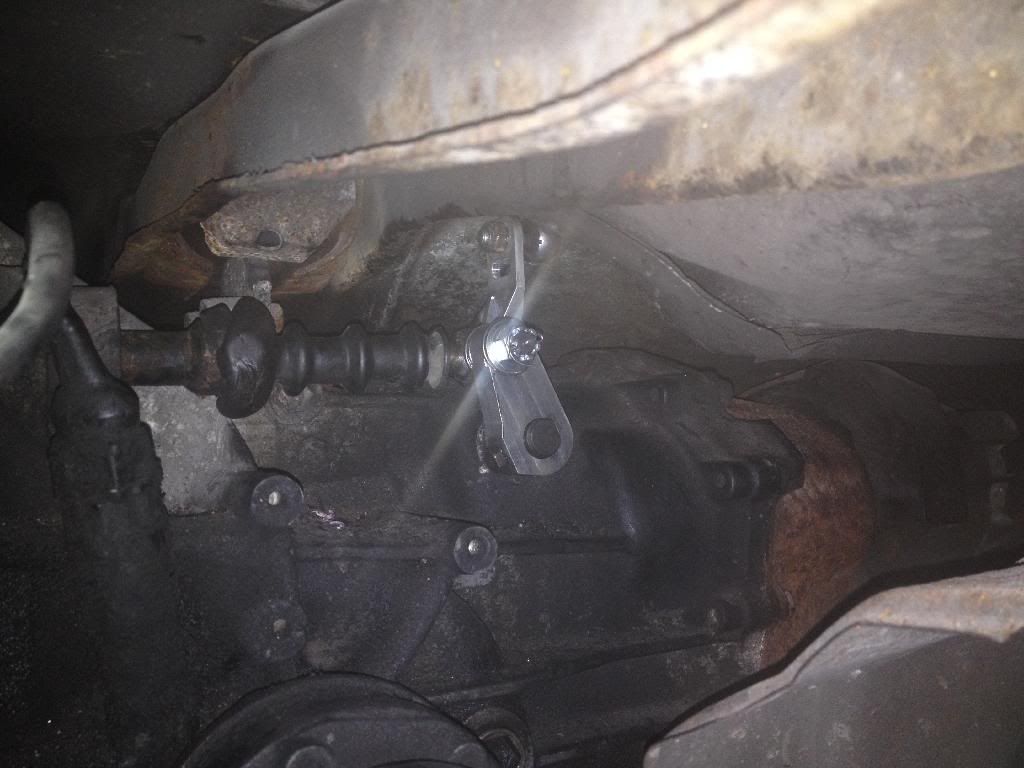
Installed the Only944 front shifter, short shift linkage and support bar - gearshift is now epic. It snicks into place like a gate shift Ferrari! However, I almost didn't use the support bar (but now so glad I did) as the bolt that holds the old one on that's on top of the gearbox is absolutely hateful to remove. If I'd had a 17mm ratchet spanner it would've been ok-ish, I had every size but and it was a complete ninja test of patience, 1/8th of a turn at a time!!! Old vs New:
C6E7FD04-E0A5-4BED-B72D-E7ED76CA1206.jpg
Installed, there looks to be loads of room on the picture, lol:
456D754F-28C4-467A-A496-FB03AA5605DF.jpg
 
ORIGINAL: uk66fastback Succeeded in dismantling the hatch lock so it now won't work ... one of the rods has now popped out so a bit of crawling around and further lash ups are required ... When the key turns with no resistance, I presume it is supposed to activate that microswitch which moves the rods and the thing pops open? The key turns and nothing happens atm ...
Yup defo microswitch. Mine gave up the ghost also. Quite common. Does your footwell switch not work? Stuart
 
one of the rods has now popped out so a bit of crawling around and further lash ups are required
The workshop manual shows how to wire the motor plug so you can adjust things correctly. If the rod popped out, check the plastic catch on the end - the securing flap on mine broke off. The new plastic end piece cost about 20p at OPC. If the end flap is clicked into place, the rod is pretty secure.
 
My footwell switch worked until I played about with the roads and one has now come out ... I have the small plastic bit that the rod goes into - and you're saying there is supposed to be a clip on there to hold the rod in place - cos I couldn't see anything and kinda thought there must be some way of holding the rod in there. So if the footwell siwtch works, the microswitch is okay then (by the lock) So why doesn't undoing the hatch lock at the back open it?
 
you're saying there is supposed to be a clip on there to hold the rod in place
Sorry, my mistake - at the boot lock end, the rods fit into holes in the actuating arms and are held in by a little plastic clip as you will observe. They just click in. The "end flaps" that lock the rods are on the outer ends, hidden behind the boot lid catches. Apols if this is over-simplistic: the motor that pulls the rods (via a cable) is on the off-side of the rear panel in the boot. One revolution of the motor pulls the cable that pulls a short rod that turns the lock plate that pulls the rods that open the catches. Simples! The workshop manual gives details of a pair of mini jump leads using 1/4" tab crimp connectors; you disconnect the motor from the wiring harness and plug them in as shown in the manual, to make the motor move manually and partially. At the 180 degree position you can adjust the rods to open the catches fully and evenly. The nice detail about the plastic ends on the rods (at the boot lid catch end) is that you can adjust the length by turning them without needing to remove them from the actuating levers. Which is just as well, as the ends are hidden behind the catches, and they break easily when old. The motor is activated either by the button in the footwell, or by the microswitch attached to the boot lock. Presumably it could also be actuated by an alarm system, but mine isn't. So if either switch is working, the boot will release. Adjustment is made by adjusting the cable length to get the right amount of movement in the rods, and then by adjusting the rods so the movement is equal, then repeat to get a satisfactory alignment.
 
No I am saying that if the footwell switch works and the key lock doesn't then your key lock microswitch is goosed, which is quite common! Stuart
 
Thanks-would need actual address--reason:--our daughter husband & family live in Whalton so we are frequent visitors to beautiful Northumberland--in fact we are coming up again in 2 weeks. Could make a little diversion to drop in & see what you've got! Cheers, Colin.
 
Did some "duct tape engineering" to defeat an incredibly annoying rattle from the passenger side door. I also discovered that the car had suffered a smashed passenger window at some point in its life (break-in attempt?) as there was still some pieces of broken glass left in the bottom of the door! Dealt with a stone-chip on the front bumper. This has recently been painted so picking one up was inevitable due to "Murphy's Law". At least now I can stop being paranoid! Replaced all three wiper-blades. Re-attached hook to rear roller-blind. Jobs remaining (in this batch)... replace door contact switch on drivers side, stop seat back knobs from dropping off (small metal clips on order) and tidy up some interior trim.
 

Posts made and opinions expressed are those of the individual forum members

Use of the Forum is subject to the Terms and Conditions

Disclaimer

The opinions expressed on this site are not necessarily those of the Club, who shall have no liability in respect of them or the accuracy of the content. The Club assumes no responsibility for any effects arising from errors or omissions.

Porsche Club Great Britain gives no warranties, guarantees or assurances and makes no representations or recommendations regarding any goods or services advertised on this site. It is the responsibility of visitors to satisfy themselves that goods and/or services supplied by any advertiser are bona fide and in no instance can the Porsche Club Great Britain be held responsible.

When responding to advertisements please ensure that you satisfy yourself of any applicable call charges on numbers not prefixed by usual "landline" STD Codes. Information can be obtained from the operator or the white pages. Before giving out ANY information regarding cars, or any other items for sale, please satisfy yourself that any potential purchaser is bona fide.

Directors of the Board of Porsche Club GB, Club Office Staff, Register Secretaries and Regional Organisers are often requested by Club members to provide information on matters connected with their cars and other matters referred to in the Club Rules. Such information, advice and assistance provided by such persons is given in good faith and is based on the personal experience and knowledge of the individual concerned.

Neither Porsche Club GB, nor any of the aforementioned, shall be under any liability in respect of any such information, advice or assistance given to members. Members are advised to consult qualified specialists for information, advice and assistance on matters connected with their cars at all times.

Back
Top